Home
::
GUIDE - Using a Chain Breaker to adjust chain length


GUIDE - Using a Chain Breaker to adjust chain length
GUIDE - Using a Chain Breaker to adjust chain length
.jpg)
BREAKING THE CHAIN.
When breaking or re-joining chain, always use a hand tool like a hex key bar. Never use a power tool or an impact wrench.
.jpg)
IMPORTANT! Attempting to remove a pin from a chain without proper care and attention risks damaging the chain breaker tool and/or the chain.
.jpg)
Place your chain in the breaker, with the chain pin you want to remove in-line with the Pin Screw. *TIP: Spray some lubricant/chain lube on the chain pin you're going to remove to make the process easier and avoid damaging the inside of the roller.
.jpg)
Wind the Pin Screw in until it just touches the chain pin.
.jpg)
Giggle the chain a little so that the chain pin is as close to centred with the bolt pin as possible.
- Begin to slowly turn the Pin Screw in to push the pin out of the chain.
- You will feel some resistance. There should not be a large amount of force needed to move the chain pin.
WARNING - USING FORCE TO PUSH THE PIN OUT CAN BREAK THE PIN SCREW! USE CAUTION AND FOLLOW THE STEPS BELOW. - If the force required seems high, or you're not sure, back the Pin Screw out slightly to allow the chain to move, then giggle the chain. Then try again.
- Sometimes you may need to hold the breaker on an angle or upside down so the chain rests in a slightly different position.
- Eye-ball the chain pin and Pin Screw pin to make sure they are aligned.
- Keep backing out and then pushing the chain pin until the chain pin moves slightly. Then back the bolt back out a little.
- At this point the chain pin will move but you may not be completely centred.
- Line up the chain pin on the pin in the Pin Screw and screw it back in again, keeping it aligned. If at any point you're not sure if it's aligned, back it out, giggle, and go again.
- The chain pin should now push out with little force required. If there is still reasonable force required, the pin on the Pin Screw is not properly centred. Back it out and try again.
- You will feel some resistance. There should not be a large amount of force needed to move the chain pin.
.jpg)
Push the chain pin through until the chain pin is just in the last outer plate on the other side (not completely out).- You'll know when you've gone far enough by backing out the Pin Screw and then lifting the chain to see if it disconnects from the link with the chain pin. If it requires a lot of force to disconnect, then you haven't pushed the chain pin out enough.
.jpg)
- On our 219P chain breakers, there is a slot designed to retain the chain pin. (see picture). With those models, you can keep pushing the chain pin until you feel resistance. The slot should be the exact amount of width required to push the chain pin as far as needed but not out of the chain plate entirely.
.jpg)
- You'll know when you've gone far enough by backing out the Pin Screw and then lifting the chain to see if it disconnects from the link with the chain pin. If it requires a lot of force to disconnect, then you haven't pushed the chain pin out enough.
RE-CONNECTING THE CHAIN
- Remove or back out the Pin Screw so that it does not protrude into the chain rail area of the tool (centre part)
.jpg)
Back the Screw (non-pin screw) out until the slot on the Screw side of the tool is clear.- Insert the side of the chain with the chain pin hanging out the side of the plate into the tool, with the chain pin located in the slot in front of the Screw.
.jpg)
Insert the roller end of the chain (the other part to be joined) into the chain in the tool so the assembly is sitting into the rail. Try to align the chain pin with the chain roller as well as you can.- You can usually visually tell by eye-balling the height of the plates on both ends of the chain. If one end looks like it's sitting higher then it is not aligned.
- You can usually visually tell by eye-balling the height of the plates on both ends of the chain. If one end looks like it's sitting higher then it is not aligned.
- Wind the Screw in slightly until it just touches the chain pin.
- Eye-ball the chain pin and make sure it is centred on the Screw end. The Screw end is concave so it should help centralise the chain pin but it is not enough to simply rely on this alone. If it is not centred, back the Screw off and adjust as necessary. Sometimes you may need to remove the chain and manually adjust the chain pin by hand.
.jpg)
Slowly wind the Screw in to push the chain pin into the chain.- IT IS VERY IMPORTANT not to force the chain pin into the chain. It will damage the chain roller and create a tight spot. You will need to replace a link if it is tight as it will cause issues when in use.
- If the pin seems to require a lot of force to push in then there is a problem. The plates and roller and pin are not aligning. Sometimes it helps to giggle the chain while it is still in the tool, by backing off the Screw a touch to relieve pressure on the chain pin.
- SLOW AND STEADY IS THE KEY.
- The resistance will drop away suddenly once the chain pin is inside the roller. Keep winding until you feel the next resistance.
- You will feel resistance when the chain pin exists the chain roller on the other side and enters the plates on the outside of the chain on the opposite side. This resistance should be similar to the initial resistance at the beginning of reconnecting the chain.
- If the resistance is significant, stop the process, back the Screw off a touch, and then re-align the chain by wiggling in the tool. Check to make sure the plates are lined up. Sometimes it does require removal of the chain at this point and some giggling and rotating of the link to allow the plate to adjust correctly.
- Sometimes, with slightly lighter manufactured chains, the plates may be a touch thinner which can allow the plates on the outer side to flex.
- If the outer plates start to bend, then check alignment.
- If the outer plates start to bend and you're certain the alignment is good, you can shim the space between the outer plates and the tool with a fine washer. Make sure you do not impede the ability of the chain pin to protrude through the outer plate when done.
.jpg)
Push the chain pin further by tightening the Screw until the Screw end just touches the chain plate.
- If the chain pin is not perfectly positioned with the same amount protruding out of the plate as other links after this, you can remove the chain and insert it into the Pin Screw position of the chain rail and use the Pin Screw to make a small adjustment by pushing the chain pin in a tiny amount.
.jpg)
.jpg)
Need Help?

Gift Certificates

Categories
Bestsellers


Special
My Shopping Cart
My Shopping Cart
Cart is empty
My Account
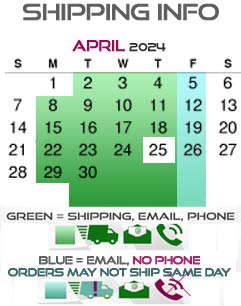
Free Same-Day Dispatch!

Product Updates via Facebook

Get notified about our holiday times

We Accept Paypal

Outstanding Service!
