


GUIDE - Disassembling / Servicing / Assembling CPR SR Clutch
GUIDE - Disassembling / Servicing / Assembling CPR SR Clutch
Servicing CPR SR Clutches
Disassembly and Assembly Tutorial
The CPR SR clutch is the same basic recreational design as the maxtorque clutch as well as many others. You can use this guide to service any of those clutches. The most obvious way to identify this style of clutch is that it runs a single large spring inside which can often be seen through the ventillation holes in the clutch drum.
If you're looking for faults and solutions, scroll further down to the bottom of this guide for common faults and solutions for the CPR SR clutch range.
This month we're showing you how to break down and re-assemble your CPR SR recreational clutch, and we'll also give you the tips and tricks to service it and keep it in the best operating order.
CONTENTS
1. Required tools and consumables
2. Remove the circlip
3. Remove the Drum
4. Remove the Thrust Washer
5. Remove the cartridge assembly circlip and then the cartridge cover
6. Remove the spring
7. Remove the Shoes
8. Clean & check the clutch components
9. Lubricate the clutch components
10. Re-assemble the clutch
This guide explains how to disassemble and re-assemble your CPR SR Clutch, as well as how to service it.
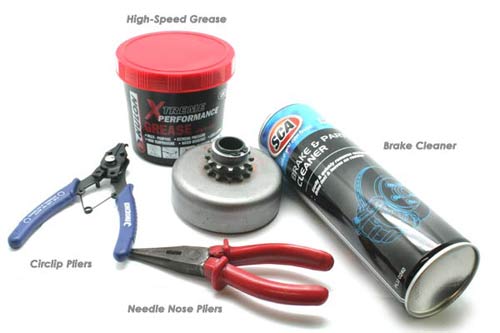
1. Required Tools and consumables
Ideally, you will require the following tools and consumables:
- Circlip pliers to remove the circlip (picks and screwdrivers can be substituted if circlip pliers are not available but be careful if using picks and screwdrivers as the circlip is under a lot of pressure)
- G-Clamp or Vice to hold the cartridge together when re-assembling (can be done by hand, but is easier with a vice or clamp)
- Brake cleaner (to clean the shoe surface and other components of the clutch
- High speed grease to re-grease moving parts upon assembly
2. Remove the circlip
Using the circlip pliers, gently remove the circlip holding the drum to the core. Place it aside.
.jpg)
.jpg)
3. Remove the drum
Slide the drum upwards and off the core. Place it aside - watch for any thrust washers stuck to the underside of the drum.
.jpg)
4. Remove the thrust washer
Remove the thrust washer and place aside.
.jpg)
5. Remove the cartridge assembly circlip and then the cartridge cover
Using the circlip removers, open the circlip as far as possible and then wobble it loose, removing it from the core entirely. The silver cover with the ventillation holes that you can see the spring through will now lift off. If it does not lift easily, you can pry it gently upwards with a screwdriver in the side of the cartridge.
.jpg)
Once the cartridge is removed, the spring and/or shoes will fall out due to the tension of the spring - it is not under a lot of pressure so it will not be dangerous and fly out anywhere at high speed.
.jpg)
6. Remove the spring
Lift the spring off the shoes (if it's still in place)
.jpg)
7. Remove the Shoes
You can now remove all of the shoes. They do not need to be put back in order, but it might be wise to keep them in the same orientation so that it retains it's exact properties from it's last use.
.jpg)
8. Clean and check the clutch components
Using the brake cleaner, clean the core and shoes. You can also clean the inside of the drum where the shoes contact if it is sticky or has been noisy in operation.
Check the contact surfaces and ensure they aren't burred or damaged. All shafts should be perfectly smooth and free from chips and marks.
Unfortunately, recreational clutch components are non-replace-able (although we do carry an uprated spring (CLICK HERE TO FIND IT IN OUR STORE)
9. Lubricate the clutch components
Using the high speed grease, VERY LIGHTLY grease the shaft of the core where the drum rotates.
DO NOT OVER-GREASE!
10. Re-assemble the Unit
Re-assembly is basically the reverse of the disassembly process, but note that when installing the shoes and spring it is easiest to leave one shoe compeltely out of the assembly, then place the cartridge cover onto the clutch. Insert the last shoe into the cartridge on an angle so that you catch it under the spring - lever it into place while holding the cartridge together (a G-clamp or vice will help during this process).
Once you have the shoe inside, keep pressure on the cartridge so that it doesn't fly apart and re-insert the circlip. Again, a couple of g-clamps or vice will help immensely here - or a friend.
Congratulations! You have just completed a service of your CPR SR Clutch. Now install your clutch and enjoy!
FAQ - CPR SR (and Maxtorque) Clutch Faults and Solutions:
1. Clutch is making a clinking noise while in operation or Clutch is sparking.
It most likely that the clutch has a small stone, some gravel, or other piece of foreign material inside which is catching as it rotates. Disassemble the clutch and clean as per the instructions above..
2. Clutch is engaging at idle.
The clutch spring has overheated and stretched. Disassemble and replace with uprated spring in our store: (CLICK HERE TO FIND IT IN OUR STORE)
The spring will overheat if used in a tall gear ratio environment, (including running a small rear sprocket, or large rear wheels) or if the clutch is not operating within the 'engagement' zone speeds. See our guide to identify if your clutch is operating in the 'overheating' zone.
The spring will overheat if idled for too long. These clutches are not designed for prolonged idling. Limit idling to a bare minimum - if starting to run engine and identify problems make sure the wheels are off the ground at all times so that the clutch does not have any pressure on it.
You can learn more about why clutches engage at idle by reading this guide CLICK HERE
3. Clutch runs fine after being cleaned, but then starts engaging at idle after some time.
The bush in the drum has worn - if you grease the shaft it will allow you further use, but at this point the clutch will need to be replaced.
If you are experiencing continual issues using an SR or Maxtorque style clutch in your vehicle, we recommend considering a race clutch or torque converter.