
: 0425 899 222
: ABN 61 163 730 130 Bank Details - Westpac: Cut Price Racing - BSB 034080 ACC 451877
Home
::
ENTMKC CTMKC1 Install Throttle Cables/Clutches Honda GX200
ENTMKC CTMKC1 Install Throttle Cables/Clutches Honda GX200
ENTMKC CTMKC1 Install Throttle Cables/Clutches Honda GX200
ENTMKC CTMKC1 Install Throttle Cables/Clutches Honda GX200
If you've bought a kit from Cut Price Racing already then it will include all the following parts, otherwise you'll need to find similar parts somewhere to complete the project.
You willl need the following parts:
1. Shaft spacer to correctly position the dry clutch
2. Up-rated throttle return spring
3. Throttle cable socket
4. Swivel Clevis & Circlip
5. 6mm Grub Screw
6. Honda Crankshaft (Clutch Retaining) Bolt
7. Oversized 8mm Washer
Installation is very simple and is outlined below:
1. Clutch Components
a. Using a 10mm socket, remove the bolt on the end of the crank shaft (holding the clutch onto the shaft). You will notice excessive play in the clutch.
b. Remove plastic protective sleeve and remove the key from the shaft
c. IF YOUR CLUTCH DOES NOT HAVE 6mm THREADED HOLES FOR A GRUB SCREW: Install the 19mm ID washer supplied onto the crankshaft
d. IF YOUR CLUTCH DOES HAVE HAVE 6mm THREADED HOLES FOR A GRUB SCREW: Install the 6mm grub screw supplied into the the rear knobble of the clutch
e. Slide the clutch assembly onto the shaft with the sprocket to the outside of the engine
f. IF YOUR CLUTCH DOES HAVE HAVE 6mm THREADED HOLES FOR A GRUB SCREW: Position the clutch about 1mm past the end of the shaft and tighten the grub screw so the clutch will not move.
g. Install the bolt and washer (Use a piston stop to lock the crankshaft [recommended] or pull on the pull start to take up any slack and tighten the bolt while holding the strap out to get more torque on the bolt.)
2. Up-Rated throttle return spring & Throttle Cable socket
a. Remove the air filter by removing the wing nut on top of the air cleaner box.
b. Remove the lid of the air cleaner box
c. Remove the second wing nut from the filter
d. Remove the filter
e. Remove the two small screws and using a 10mm socket remove the bolt.
f. Slip the vacuum hose out from behind the fuel controls under the filter and lift the bottom of the air filter box up and over the long 6mm stud.
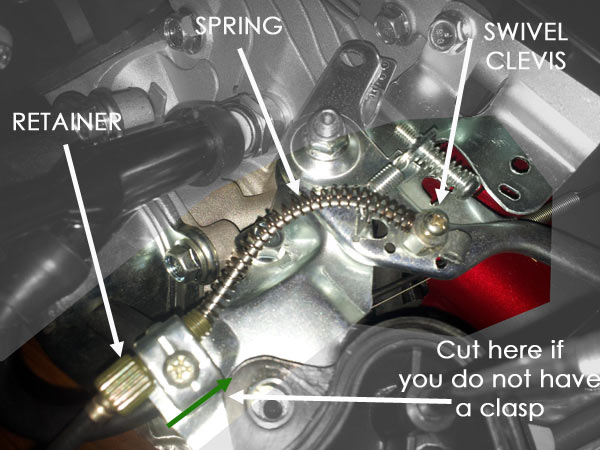
g. If your engine already has a clasp at the point where the throttle cable retainer is pictured in the picture, simply install as shown in the picture. You can use the nut supplied on the inside of the clasp to locate the throttle cable more accurately if you like.
h. If your engine does not have a clasp, remove the entire panel by removing the M6 bolts (two in the crank case in front of the fuel tank and one in the manifold next to the carb.
i. Remove the throttle lever by removing the 6mm Nyloc nut and then unclipping the spring from the lever (underside). Remove the lever and all the components noting which way they are positioned and the layer order.
j. Drill a hole the same size as the shaft of the rotating clevis (see picture) in the throttle lever at the position in the picture.
k. Push the clevis through the lever and attach the circlip
l. If your engine does not have a clasp (as per step h) you will need to cut the panel described in step h. Put the panel in a vice and make a 15mm cut as shown in the picture. Bend the resulting tag upwards so it is vertical and then drill an 8mm hole the same size as the throttle retainer shaft. Install the throttle retainer through the hole and fasten with the nut. Re-install the plate as a reverse of step h.
m. Re-install the throttle lever as a reverse of step g. (lubricate as per step n)
n. Lubricate the parts of the throttle lever that connect together at the 6mm bolt so that they rotate freely (use WD40, Lanotech, Baby oil or engine oil)
o. Remove the shroud from the throttle cable inner by pulling it away from the engine, slide it completely off until the inner is completely exposed.
p. Loosen the Phillips head screw in the rotating clevis so that the throttle cable can fit through.
q. Push the throttle cable through the rotating clevis from the rear so that the cylinder stops the throttle cable from pulling all the way through. Tighten the Phillips screw on the clevis.
r. Feed the up-rated throttle return spring over the throttle cable inner and hard up against the rotating clevis.
s. Feed the throttle cable through the throttle cable retainer you installed in the tag you made and bent upward or installed under the clasp that was already on the engine. (ensure the spring is located between the throttle cable retainer and the swivel clevis. It should push the lever away from the throttle cable retainer when set right. You may need to remove a few coils from the spring if you find it far too long.
t. Replace the throttle cable sheath and push it into the throttle cable retainer.
You willl need the following parts:
1. Shaft spacer to correctly position the dry clutch
2. Up-rated throttle return spring
3. Throttle cable socket
4. Swivel Clevis & Circlip
5. 6mm Grub Screw
6. Honda Crankshaft (Clutch Retaining) Bolt
7. Oversized 8mm Washer
Installation is very simple and is outlined below:
1. Clutch Components
a. Using a 10mm socket, remove the bolt on the end of the crank shaft (holding the clutch onto the shaft). You will notice excessive play in the clutch.
b. Remove plastic protective sleeve and remove the key from the shaft
c. IF YOUR CLUTCH DOES NOT HAVE 6mm THREADED HOLES FOR A GRUB SCREW: Install the 19mm ID washer supplied onto the crankshaft
d. IF YOUR CLUTCH DOES HAVE HAVE 6mm THREADED HOLES FOR A GRUB SCREW: Install the 6mm grub screw supplied into the the rear knobble of the clutch
e. Slide the clutch assembly onto the shaft with the sprocket to the outside of the engine
f. IF YOUR CLUTCH DOES HAVE HAVE 6mm THREADED HOLES FOR A GRUB SCREW: Position the clutch about 1mm past the end of the shaft and tighten the grub screw so the clutch will not move.
g. Install the bolt and washer (Use a piston stop to lock the crankshaft [recommended] or pull on the pull start to take up any slack and tighten the bolt while holding the strap out to get more torque on the bolt.)
2. Up-Rated throttle return spring & Throttle Cable socket
a. Remove the air filter by removing the wing nut on top of the air cleaner box.
b. Remove the lid of the air cleaner box
c. Remove the second wing nut from the filter
d. Remove the filter
e. Remove the two small screws and using a 10mm socket remove the bolt.
f. Slip the vacuum hose out from behind the fuel controls under the filter and lift the bottom of the air filter box up and over the long 6mm stud.
g. If your engine already has a clasp at the point where the throttle cable retainer is pictured in the picture, simply install as shown in the picture. You can use the nut supplied on the inside of the clasp to locate the throttle cable more accurately if you like.
h. If your engine does not have a clasp, remove the entire panel by removing the M6 bolts (two in the crank case in front of the fuel tank and one in the manifold next to the carb.
i. Remove the throttle lever by removing the 6mm Nyloc nut and then unclipping the spring from the lever (underside). Remove the lever and all the components noting which way they are positioned and the layer order.
j. Drill a hole the same size as the shaft of the rotating clevis (see picture) in the throttle lever at the position in the picture.
k. Push the clevis through the lever and attach the circlip
l. If your engine does not have a clasp (as per step h) you will need to cut the panel described in step h. Put the panel in a vice and make a 15mm cut as shown in the picture. Bend the resulting tag upwards so it is vertical and then drill an 8mm hole the same size as the throttle retainer shaft. Install the throttle retainer through the hole and fasten with the nut. Re-install the plate as a reverse of step h.
m. Re-install the throttle lever as a reverse of step g. (lubricate as per step n)
n. Lubricate the parts of the throttle lever that connect together at the 6mm bolt so that they rotate freely (use WD40, Lanotech, Baby oil or engine oil)
o. Remove the shroud from the throttle cable inner by pulling it away from the engine, slide it completely off until the inner is completely exposed.
p. Loosen the Phillips head screw in the rotating clevis so that the throttle cable can fit through.
q. Push the throttle cable through the rotating clevis from the rear so that the cylinder stops the throttle cable from pulling all the way through. Tighten the Phillips screw on the clevis.
r. Feed the up-rated throttle return spring over the throttle cable inner and hard up against the rotating clevis.
s. Feed the throttle cable through the throttle cable retainer you installed in the tag you made and bent upward or installed under the clasp that was already on the engine. (ensure the spring is located between the throttle cable retainer and the swivel clevis. It should push the lever away from the throttle cable retainer when set right. You may need to remove a few coils from the spring if you find it far too long.
t. Replace the throttle cable sheath and push it into the throttle cable retainer.